Entering Data
Data in the application is either mandatory or optional. Mandatory data is required for the creation of a new data record either to uniquely define a data record or as a basis for specific functions. Mandatory data is marked with an asterisk "*" following the data definition. A variant of this is a mandatory data field which is automatically filled with a default value by the software. These fields are marked with an asterisk in brackets "(*)". Mandatory fields have to be filled in before a data record can be stored.
Optional data is not necessarily required for core functions and is often used for information purposes only. This can be left out if it does not serve any purpose.
Data can be entered both in the Table mask and the Edit panel. One important restriction is that the Table mask sometimes does not show all data that can be captured for a record. This is usually the case when the columns that would be required in the table display exceed the limit for readability. In these cases, the table display is restricted to the core data and the rest of the data fields are available in the Search/Edit panel only. Depending on the kind of data, either a plain text entry is required or a pull-down menu containing a list of choices is provided. For a plain text entry, a free combination of arbitrary characters can be chosen. The length of the entry varies depending on the data type (e.g. a field for a 3-letter IATA code allows fewer characters than a field for a freely definable remark).
If a pull-down menu is available, this can be opened by marking a field and then clicking on the arrow appearing at the right margin of the field. Pull-down menus are usually derived from master data tables. This master data management and provision by pull-down menus ensures that identical data is used for the complete operative business company-wide. By using the scrollbar at the right margin, you can scroll to the desired entry and select it by left-clicking on it. You can leave a data field featuring a pull-down menu empty by selecting the blank entry at the top of the pull-down-list.
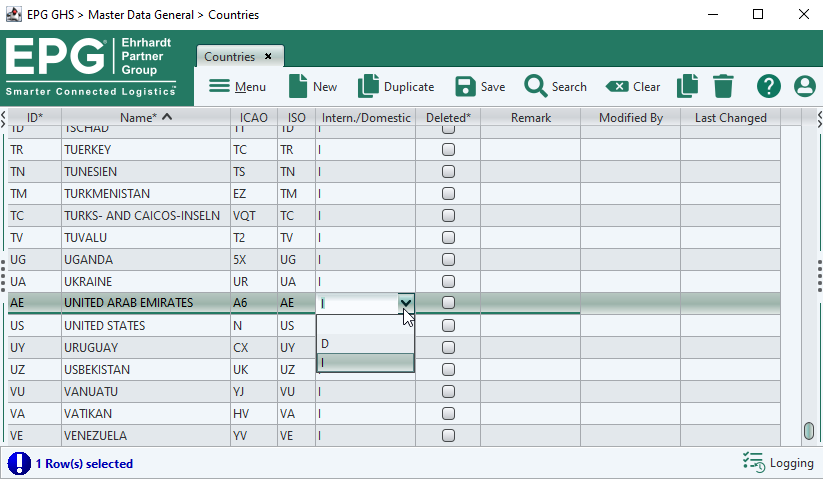
Example of a pull-down menu
Please note: The entries in the pull-down-list are sorted alphanumerically. By entering a letter/number in the data field on top of the menu, the list automatically jumps to the corresponding position in the list. This function also supports the entry of multiple characters and facilitates the navigation in the pull-down-list. An entry can also be made completely manually if it corresponds exactly with the predefined specifications.
A second variant of the pull-down menus allows you to select dates – e.g. for the period of validity for prices, contracts etc.
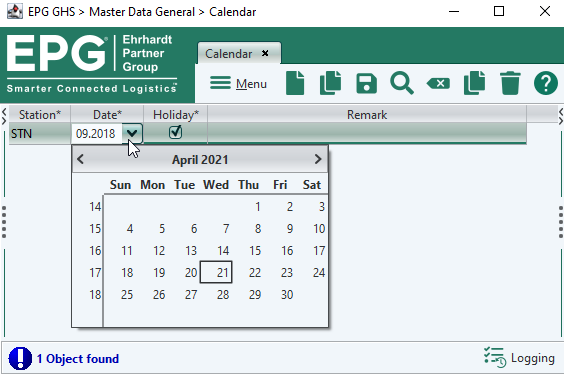
Setting dates pull-down menu
Calendar pull-down menus open with the current date selected as default. By clicking the > or < in the calendar header you can browse forward/backward through the months. For browsing year wise, use the buttons >> and <<. After selecting a date by clicking on a specific day in the monthly calendar, the pull-down menu closes and the date including the current time is entered in the date field.
Date fields can also be edited manually. Please observe the date structure when editing an entry manually: DD.MM.YYYY<blank>hh:mm (see Exemplary system integration with the application above)! The application features an intelligent completion mechanism for manual data entries which is capable of interpreting entry variants:
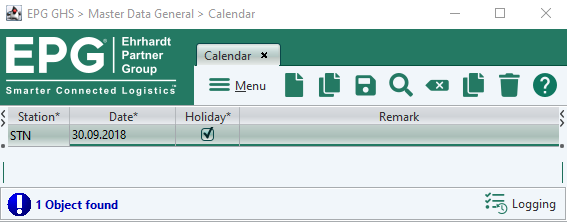
Example: The entry 30.09.18 (30th of September 2018) would automatically be completed and adapted by the system to 30.09.2018 00:00 – (i.e. the year would be completed to four digits and the time stamp would be added.) If no year is entered, the system automatically enters the current year.
Manual editing of automatically completed data is possible at any time.
The last type of entering data is the marking of checkboxes.
Example: In the master data table Customer, module Master Data Contract, a checkbox titled Cash is available. Marking this checkbox will define a customer as liable to pay cash for all services provided. This has an effect later on in the operative service recording: Only those customers that have been defined as liable to pay cash can later be billed directly with cash invoices in the module Service.
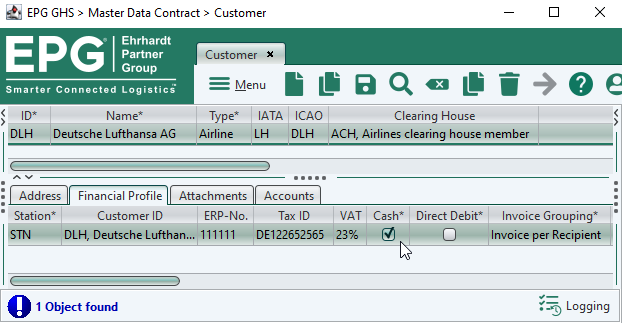
The checkbox function
Please note: A checkbox can also be marked by clicking the spacebar instead of the left mouse button when you use the TAB key to browse through the data fields.
Handling of concurrent data modifications
Independent of the way in which the data was entered by the user, there may have been modifications of the data record by other users or interfaces while editing a record. In order to ensure that conscious decisions can be taken to resolve a potential data conflict, the user is prompted to refresh the screen with the following message:
Data is no longer current since it was modified by another user or system.
Please reload and apply the changes again.
The user will not be allowed to save the changes, unless the screen was refreshed and the changes are entered again.